
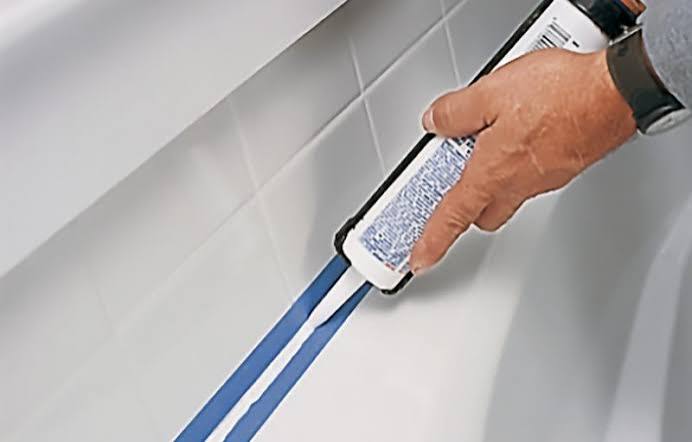
There is a particular kind of bathroom misery that starts with a thin gray line. The caulk around the tub has cracked, darkened or peeled away, and water is slipping behind it every time someone showers. Left alone, that tiny gap can rot the wall behind it, stain the ceiling of the room below and feed mold you will never see until the damage is serious. The fix is cheap and well within reach of a first-time DIYer. It simply needs patience and a bit of technique.
Why caulk fails
Caulk is not permanent. It stretches and shrinks as the tub expands with hot water and settles under weight. Over time it loses flexibility, cracks and pulls away from the surface. Soap scum and constant moisture give mold a place to settle in. If you can see black spots that scrubbing will not remove, or if you can slide a fingernail under the edge, the caulk has done its job and it is time to replace it.
Gather the right supplies
You will need a caulk-removal tool or a plastic scraper, a utility knife, rubbing alcohol, a rag, painter’s tape, a caulk gun and a tube of sealant. For the sealant itself, choose a product labeled for kitchens and baths. A 100 percent silicone caulk is the most waterproof and long-lasting, and many include mildew-resistant additives. Siliconized acrylic latex is easier to clean up and can be painted, but it is generally less durable in constant moisture. Pick a color that matches your tub or grout.
A small tip: buy a tube with a nozzle you can cut at an angle, and have a spare tube on hand in case you make a mistake.
Remove every trace of the old caulk
This is the step people rush, and it is the reason new caulk fails early. New caulk will not stick to old caulk. Run a utility knife along the top and bottom edges of the old bead to cut it free, then peel and scrape it away. A removal tool helps with stubborn bits. Go slowly so you do not gouge the tub surface, especially if it is acrylic or fiberglass.
When the bulk is gone, clean the joint thoroughly. Scrub away soap scum and mildew with a bathroom cleaner, then wipe the area with rubbing alcohol to remove residue and oils. If you see black mold that has penetrated, treat it with a suitable cleaner and let the area dry completely. Moisture trapped behind new caulk is a recipe for trouble, so give it time. Leave the joint dry for at least 24 hours, using a fan or a hairdryer on low to speed things along.
Fill the tub before you caulk
Here is the pro secret. Fill the tub with water first. The weight of the water makes the tub settle slightly, opening the gap to its widest. When you caulk in that position, the sealant stays flexible instead of being squashed or stretched when the tub is in use. Leave the water in until the caulk has cured, or at least until the initial skin forms, following the manufacturer’s directions.
Tape for clean lines
Apply painter’s tape above and below the joint, leaving a gap about one-quarter inch wide. This guides your bead and makes the edges look sharp. Press the tape down firmly so that caulk does not sneak underneath.
Apply the bead
Cut the nozzle at a 45-degree angle, making the opening slightly smaller than the gap. Puncture the inner seal. Hold the gun at an angle and apply steady pressure, moving along the joint in one continuous motion if possible. It is better to push the caulk into the joint than to drag it behind you. Aim for a consistent bead that fills the gap.
If your gap is wider than about one-quarter inch, push a foam backer rod into it first so you do not use excessive caulk, which can crack as it cures.
Smooth and finish
Within a minute or two, run a gloved finger dipped in a little soapy water along the bead, or use a caulk-finishing tool. Press lightly to force the caulk into the gap and leave a neat concave surface. Remove the painter’s tape right away, pulling it away at an angle, before the caulk skins over. Wipe off any smears with a damp cloth.
Let it cure
Most silicone sealants are water-ready in 24 hours, though some are faster. Read the label. Avoid using the shower until the cure time has passed. Resist the temptation to test it early.
Keep it lasting
Wipe down the tub and walls after showers, run the exhaust fan, and clean the caulk gently with non-abrasive products. Check it twice a year for gaps. Replacing caulk every few years is normal.
Renters, a quick note
If your landlord is responsible for maintenance, report failing caulk in writing before water damage occurs. Preventable moisture damage can lead to disputes over who pays. Ask permission before doing repairs yourself, so you are not blamed for anything that goes wrong later.